Showing posts with label cosmetics. Show all posts

Friday, August 23, 2013

E.L.F. Studio HD Blush

Have you ever wondered why women are obsessed with rosy cheeks? What has made that flushed look so appealing to us? Rosy cheeks are actually a cue to youth and fertility- a cue that men use to find an attractive mate. If a woman has rosy cheeks, she is probably fertile, and young enough to be child-bearing. (Sorry I just had to put this in, I'm a social psychologist writing a blog about blush and rosy cheeks!)

This is why we apply blush to our cheekbones. It makes us look younger, awake, and healthy. There was actually one point in my duration of makeup collecting when I was OBSESSED with blushes. I wanted to find the perfect coral/pink shade that was long lasting, easy to apply, and made me look like I was alive and not half-dead from the lack of sleep the night before. While shopping on my favourite bargain makeup website (eyeslipsface.com), I stumbled across this. And quite honestly, I may never go back to traditional blushes again.

Introducing: the only blush you'll ever need.


Today, we're going to look at a product that has quickly become one of my FAVOURITES from the E.L.F. Studio Line. E.L.F.'s HD (High-Definition) Studio Blush is a new addition to their makeup line, I think it was released in early 2013. I've had these babies sitting in my makeup drawer for quite some time now, the only reason I hadn't touched it was because I realized one day that I had accumulated 5 different, full-sized blushes, and hadn't even touched the pan in the blush that I was using at the time (E.L.F. Studio Blush in Candid Coral). Once I could see the pan and manage to make a sizable hole in the product, I gave it to my mom and immediately opened these up, as I had literally been dying to try them since I first ordered them online.


The E.L.F. HD Blush is thinner than a cream and almost has the consistency of a foundation. Because it is SUPER pigmented, a little bit goes a long way. You can apply this like a cream blush and blend it in with your fingertips, or you can use a small stippling brush. I personally, use E.L.F.'s Studio Small Stipple Brush.


This is a synthetic, duo-fibred brush that picks up minimal product, but can blend to an airbrush finish. It has the diameter of about 1.5cm or 3/4", which makes it perfect for getting into small delicate areas like the contours of the face and high end of the cheeckbone. This brush is perfect for applying and blending cream blushes, highliters, concealer, foundation in those hard to reach areas (Though I would most definitely recomend using a separate brush for each of those functions haha). At only $3 USD (available at eyeslipsface.com), having 3-4 of these brushes for different products is no issue at all.


I really love this product's packaging.  It comes in a small, 0.34oz. (10mL) bottle, which really isn't very much volume-wise, but you certainly get bang for your buck- considering that you can probably get more than 60 applications with one bottle. The pump is easy to use and super easy to control- which is crucial because you literally only need a quarter of a pea-sized amount for both of your cheeks (and maybe even a friend's), anymore than that and I promise you, you will look like a clown. That is how pigmented it is. It also lasts a VERY long time, I came home one day after 12 hours of wear and I still had blush on my cheeks! :)


I find that the easiest way to apply this is to squeeze a tiny bit onto the back of my hand, swirling it into a small circle, dipping my stippling brush into the circle and applying the product to my face, blending in small stippling motions.


The blush comes in 5 colours, Superstar (a peachy pink with a slight gold sparkle), Headliner (a mauve-based pink), Diva (hot pink), Encore (a purple-pink) and Showstopper (deep purple). I own Headliner and Superstar. The slight, gold sparkle is actually really nice, it adds a lovely blow to the tip of your cheek bones.


Superstar (peachy pink) and Headliner (mauve-pink).
Me wearing Headliner (Left) and Superstar (right). 

E.L.F.'s HD blush is a less expensive alternative to the most-sought after HD Blush by Make Up For Ever ($31 CAD, available at Sephora). E.L.F.'s blush costs $3USD, and has a little bit more product in the tube. E.L.F.'s comes in only 5 colours and MUFE's is available 14 shades, but regardless of your skin tone, I'm sure that at least one of the 5 shades E.L.F. offers will suit you. (I don't own MUFE's version, but if I ever get a hold of it, I'll certainly do a comparison.)

I love this blush so much, it's probably going to become a staple in my everyday makeup arsenal. Not only is it super pigmented and incredibly long lasting, it's only THREE BUCKS- and that's cheaper than my favourite coffee at Starbucks! Other long lasting blushes will easily put you at least $30 in the hole. You could buy 5 of these blushes and pay the E.L.F. shipping rate and it'd still be cheaper than one high end blush!

That's all from me folks! If you own the E.L.F. HD Blush, I'd love to hear your experiences with it. Or if you own MUFE's version, let me know how you're liking that one! Don't forget to subscribe and comment below!

xox,
ysobel


Wednesday, August 14, 2013

Clarins 3-Dot Liner vs. E.L.F. Waterproof Eyeliner Pen

Aloha!

Apologies for this unannounced hiatus from the blog scene- the past month has been full of birthdays, family vacations (my family going on vacations, not me sadly) and loads of business. I am preparing a few entires for release in the next few weeks so stay posted!


Today we're going to be looking at (one of) my favourite liquid liners and its budget-friendly sister. Clarins 3-Dot Liner and E.L.F. Waterproof Eyeliner Pen are the cosmetic's world answer to the trouble of tightlining - the process of lining only the eyelash line to create the appearance of thicker lashes. The purpose of the triple tip is to apply pigment in between the lashes on the lash line, as opposed to dragging your super sharp pencil as close to the lash's edge as possible.

The Clarins 3-Dot Liner is a limited edition eyeliner that was recently released with its Fall 2012 collection, that retails at $27 CAD (I purchased this at The Bay). The ELF Waterproof Eyeliner Pen is a recent addition to their Essentials collection, and retails at $3 CAD/USD, available on eyeslipsface.com.


The Clarins tip is longer with the tips more spaced apart compared to its ELF sister. Clarins' tip is also much more flexible, which makes gliding it along the lash line a more comfortable experience (I.E.: When you would use it as a liquid liner to create a bolder solid line). Being further spaced apart, I find the Clarins liner easier to use; I'm not petrified of poking my eyes out or accidentally punching myself in the face trying to apply eyeliner. The flexible tip also makes applying a solid liquid liner line on the bottom lashes very easy, it's actually a bit painful using the firmer tip of the E.L.F. liner. On MUA, a lot of reviewers agree that using the E.L.F. pen to create a solid liquid line is really uncomfortable.


Here the two pens are going head-to-head in the pigmentation and lining division. The Clarins liner is much more pigmented than the ELF counterpart, and creates cleaner, more uniform dots. The solid line is much more smooth and even in colour. I actually had to drag the ELF liner across the skin of my hand. One thing I've also noticed (that you can't really tell in this picture) is that the ELF formula is a bit runny and has the tendency to bleed on the skin and get really messy if you aren't careful. The Clarins formula seems thicker, almost like a gel-like consistency. I wouldn't say that the ELF formula is water proof, but it is certainly water resistant, as is the Clarins formula.


Looking at Before (sans eyeliner) and After photos, you can see the effect of tightlining on the eye- it does make the lash line appear thicker.  Comparing ELF and Clarins liners, there is very little difference between either eye (my apologies for the blurry after photo, I'm still trying to figure out how to use this new camera I got for my birthday!)


 The triple tip really gets into the skin between each lash, which is totally awesome.


Here's the finished product- ELF on the left (your left) and Clarins on the right, along with 1 coat of Lancome lash primer and Elizabeth Arden's Ceramide mascara.

The verdict: The Clarins liner is a superior product in its packaging, tip form, pigmentation and formula. When we look at the end result however, there really is very little difference in the finished product- both make tightlining a breeze and achieve the look of a fuller lash line. The Clarins eyeliner does carry a hefty price tag- you could actually purchase 9 E.L.F. eyeliner pens for the same price! Considering that eye cosmetics should be tossed after 3-6 months, the E.L.F. eyeliner is certainly a much better value, and when applied carefully, achieves the exact same look at its Clarins counterpart. If you really can't stand the firmer tip of the E.L.F. pen and have the extra dough to spend, then treat yourself to the Clarins pen, it is certainly a very luxurious eyeliner!

TooFaced released a 3-Way Liner similar to these that I've yet to try, I haven't seen it in any Sephoras in Canada. Once this Clarins liner runs out, perhaps I'll make a trip to the States and pick one up :)

That's all from me folks! Keep checking back for more updates and reviews!

What's your favourite way to tightline your lashes, with a pencil or with a liquid liner? Have you used a triple-tipped eyeliner before? I'd love to hear from you! Don't forget to subscribe and comment below!

xox,
ysobel

Thursday, June 27, 2013

Scrub-a-dub-dub: Your Guide to Skin Exfoliation

Aloha :)

First off, I wanted to thank everyone for their well wishes while I was recovering from my wisdom tooth extraction. I was actually able to start solid foods by the 3rd day and when I saw a few friends on the weekend, thy told me my face looked like I had never had surgery at all. Hooray for icing frozen green beans! My bottle of T-3s is still full and sitting on my side table... maybe I'll save those for a rainy day (You never know when you might fall off a cliff or break your arm, right?)

So while I was taking some time off, I was reading through my last post about milia and realized that while I recommended eye creams, I didn't recommend any exfoliating products/procedures. So today, I'm going to let you guys know the inside scoop on skin exfoliation and why it's so important!

Exfoliating your skin is the process of removing the top layer of dead skin cells. It is important to perform a thorough exfoliation at least once a week to ensure that your skin care is penetrating your actual skin and not just sitting on the surface. It also keeps milia, blackheads and whiteheads at bay by ensuring that your skin can effectively release its toxins/dirt/other junk without being blocked by a layer of dead skin. This can be achieved through manual and chemical exfoliation.

image c/o lifefoodnutrition.org
Manual Exfoliation
This process removes the top layer of skin through mechanical forces. Facial scrubs, facial peels (as in the ones you pain on your face and physically peel off), and things like a simple wash cloth fall under this category.
Facial scrubs are like cleansers that have small particles in the formula and gently buff your skin's surface as your gently massage the product into your face. Even if your daily face wash has a few exfoliating particles in it, it is important to perform a deep and thorough exfoliation weekly to get rid of things your daily cleanser can't handle.
When using a facial scrub, massage the product gently into your face with your fingertips or a face brush. DON'T use the palms of your hands (as satisfying as it may feel) to massage the product in because the skin on your face is very delicate and you don't want to aggravate it if you're massaging too hard.
Facial peels are probably my favourite kind of exfoliator. They are usually a thick, goopy consistency in a jar form so you can get into it with an applicator that's usually provided. Like any facial exfoliation treatment, this should be used about once a week as well.
Before you use a facial peel, cleanse your face with your normal cleanser. After that, "paint"/apply the peel onto your face with the paddle or brush applicator that is provided and wait for it to dry. Once it's dry to the touch, gently rub at the edge of the peel and slowly "peel" it off of your face. It's actually really amusing (I find) because I always try to remove my peel in one piece and fashion a weird, skin-like mask out of it. You also get to see all of the dead skin cells on the side of the peel that was against your face. It's really cool!
If you don't have a scrub or a peel on hand, you can always use a washcloth. Just load it with your favourite cleanser and run it under water to lather it into a light foam. Massage the foam into your skin with the wash cloth and rinse away.

Chemical Exfoliation
 Chemical exfoliants come in the form of peels. These peels contain a small amount of acid in them, and when applied to your face in a cleanser/lotion, they slough off the top layer of skin. They are strong but effective. AHA's, BHA's (Alpha and Beta hydroxy acids) and glycolic acid are common exfoliants used in chemical peels.
One example of a really easy to use chemical peel is Philosophy's The Microdelivery Tripe-Acid Peel ($88 CAD for 12 individually wrapped peels, available at The Bay). It comes as individually packaged pads that are soaked with the solution that you gently swipe across your face and rinse off (Kind of like those OXY pads we grew up with as kids). I have a few of these at home that I won from a gift basket and I've yet to try them out. You can definitely expect a review coming up soon!

My Favourite Exfoliators
My skin care arsenal if currently equipped with two exfoliators that I love to death.

image c/o elizabetharden.com
Elizabeth Arden's Visible Difference Peel and Reveal Revitalizing Mask
This falls under the category of mechanical peel. I LOVE this stuff. It has a gel-like consistency, a gorgeous pinkish colour and it smells like wine (probably from the cabernet grape extract). The rubber spatula it comes with makes it a breeze to apply (It came with a brush like applicator before they changed the packaging. I can't imagine how difficult it must have been to apply this stuff with a fan brush).
When I get a bad reaction to a skin care product, (Or when I'm having a horrible skin day) my skin gets really puffy and then it starts to flake (Believe me, it's really unattractive). When I'm at the flaking stage, I apply this mask at night time after I've cleansed my face. I can actually feel it tighten my skin as it tightens while it dries (usually about 15-20 minutes). Once it dries to a shiny skin, I gently peel it off of my face and continue with my skin care regime as usual. Everything goes on so smoothly and my skin just glows after using this. Love it!! ($41 CAD for 50mL available at Shoppers Drugmart, The Bay and Sears).


The Micro Exfoliating Wash
Philosophy's The Micro Exfoliating Facial Wash
I received this product in a gift set I got at Christmas. It's a gel-like cleanser that lathers into a light foam.
When you apply it on your face, it feels like a scrub with small particles gently buffing away at your skin. I've yet to figure out if it is actually beads (I can't see any in the formula, maybe I'm blind) or if it's a chemical exfoliant (I don't see any acids in the ingredients). What I can tell you is that after using this in the shower, my face feels really clean and it softens its texture. Once I get more info on this, I'll definitely do a full review! ($44CAD for 280 mL available at The Bay and Sephora).


There you have it, your guide to exfoliating your skin. Let me know if any of you have tried these products, or if you haven't, let me know of your favourite ways to exfoliate your skin!

xox,
ysobel

Tuesday, June 18, 2013

A-milli-a-milli-a-MILIA?

I got my wisdom teeth removed yesterday morning and I’ve got to say, recovery hasn’t been as bad as I thought it would be. My cheeks haven’t swelled up like crazy and I haven’t had any pain that is bad enough to merit taking the T-3’s that my doctor prescribed to me. I’m just feeling a little soreness and a tiny bit of swelling in the bottom right side of my mouth, but aside from that recovery has been progressing well. Since I’ll be home for the next few days I hope to be blogging a little more often this week.


Have you ever gotten weird little bumps around your eyes or your face that never, ever, seem to go away? You know for sure they aren’t pimples (because duh, they haven’t gone away), they aren’t black heads or white heads because they look like they look like bumps growing under your skin. You probably got them after trying new skin care products- likely an eye cream or an entirely new skin care regime.

A milia seed.


These, my friends, are called milia. That, is a milia seed that recently popped out of my left eyelid the other morning. Finally- I had been waiting for these babies to pop out of my skin for months now. I got them after using this sample of a luxury eye cream (that will remain nameless) for a few weeks. I probably developed about 7-8 milia bumps on both of my eyelids. Although only one of the 7/8 that I had popped out, it was the biggest one that was bothering me the most. You can see it in this photo here, from my Too Faced Natural Eye Shadow palette review. It’s sitting just over my left eye, closest to the bridge of my nose.

For those that don’t know, milia seeds are small, keratin-filled cysts that form underneath the epidermis (outer most layer) of your skin. They usually form from using skin care products that are too rich for your skin combined with a lack of exfoliation (sloughing off dead cells from the skin’s surface).

My skin is particularly dry, and as much as I want to hydrate it like crazy to keep my lines and wrinkles at bay, being a dry-skinned person I need to remember that I need to exfoliate often and use products that are light enough but hydrating enough for my eye area. The skin around your eyes is especially prone to things like milia because it is much thinner than the rest of the skin on your face. If you’re concerned about the skin on your eye contour, you need to use a moisturizer specialized for the eye that is separate from the one you use on your face because of how delicate the skin is here. Using a face moisturizer in your undereye area might just give you more milia.

What did I do to remove my milia?
After I noticed these bumps over my eye lids, I began to exfoliate like crazy. Removing the skin on top of the milia surface will help your milia pop right out of your skin. Whatever you do, DO NOT POKE AT THEM WITH A NEEDLE. If they are really bugging you, head down to a medical spa that specializes in milia removal and they’ll take care of the problem for you.

What can I do to prevent the formation of milia?
Like I said earlier, make sure you exfoliate your skin regularly so that your skin can properly remove toxins and other gross things from its surface efficiently and effectively. Use skin care that is appropriate for your skin type (first, figure out what your skin type it and what feel best to you). Some of the eye creams that I’ve used in the past that don’t give me any milia problems but hydrate beautifully are Clinique's All About Eyes ($37 CAD for 15 mL) and Biotherm's Skin-Ergetic Eyes ($40 CAD for 15 mL). I’m working on finishing up my jar of Clinique’s All About Eyes, but once that’s gone I’m going straight back to the Biotherm cream.


I think I’ve got a few milia on the side of my face and I’ll probably get those removed the next time I see an esthetician for a facial. I’ll keep you all posted on the status of my milia around my eyelids as they continue to pop out, haha.

Have you ever had milia before? Ever gotten them professionally removed? I'd love to hear from you!

xox,
ysobel

This is me in recovery mode. Yes, those are resealable bags full of frozen green beans on my face.

Wednesday, June 12, 2013

ESTEE LAUDER/MAC WAREHOUSE SALE

Hey y'all!

So this past weekend was the Estee Lauder/MAC Warehouse sale in Markham, ON. It's a sale that happens a few times a year, where they sell cosmetics at crazy reduced prices. Some of the brands featured this year were Estee Lauder, Mac, Origins, Clinique, Bobbi Brown, Coach, Smashbox, DKNY.

My Mom was able to score tickets for the Saturday and Sunday sales, and I just wanted to share my experience with you!

The line up on Saturday morning, taken from the front of the line.
We got there at around 9:30 AM and waited in line for about 45 mins before getting in. That line wraps all the way around the building on the outside too. Crazy! Lucky there were no insane people in line. Everything went really smoothly, I was pleasantly surprised!


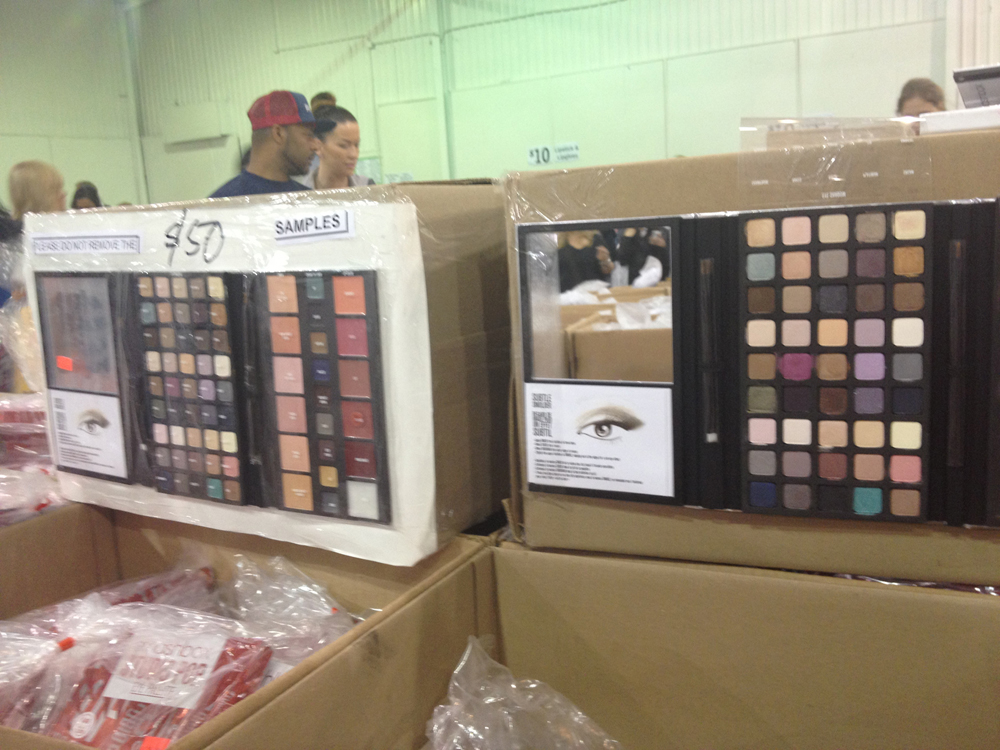
Eye shadow table
I actually thought the warehouse was going to be as crazy as an anthill, but surprisingly it was not! Here's a photo of one of the tables holding eye shadows. Most of the setup was like this- a table full of testers that were strategically taped up, and an area to claim what you wanted. Each tester was numbered and a pad of paper and pencils were supplied on each table. You write down the numbers you wanted, and go to a designated area where your selection is bagged for you.

Here are a few more photos of some of the things they were selling. A lot of them we at crazy prices!


Here's my haul for the two days I went:

Saturday Morning Haul
From L-R: Clinique A Season's Worth of Pretty palette (containing 5 lip colours, 5 eye shadow colours and 3 cheek colours), Clinique Bold Eyes to Go set (Full size bottom lash mascara, eye shadow duo, travel eyeliner and travel High Impact Mascara + makeup bag), Smashbox Try It Kit containing Travel sizes of the Photo Finish Foundation primer, Photo finish eyelid primer, limitless eyeliner, full exposure mascara and lip enhancing gloss), Estee Lauder Sumptuous Extreme mascara, Clinique Repairwear Eye cream, Clinique moisture surge extended thirst relief cream, Clinique Chubby Stick in Whole Lotta Honey and Mac Lip Glass in Entice.

Sunday Afternoon Haul
From L-R: Ojon Conditioner, Ojon Leave-In treatment, Michael Kors for Estee Lauder kit (Full size lipstick, travel lip gloss, sumptuous extreme, eye liner, nail polish and full size blush bronzer duo in a coordinated MK makeup bag), Clinique Dramatically Different Moisturizing Lotion, Clinique Moisture Surge Extended Thirst Relief, and a Clinique Shaving set for Ronnie boy.


Pot of Gold at the end of the rainbow
After checking out, you're asked to surrender your ticket. In return, we received a full-size Mac Pro Longwear Eyeshadow in Always Sunny. Also, if you donate $5 to breast cancer research, you receive another gift! Two full-size Mac Mineralize Eyeshadows and a Mattene Lipstick. Here eyeshadows are pictured in Pretty & Prim (pink and burgundy) and Heaven & Earth (Teal and black) and the lipstick is in Nocturnal Instincts.

So that was my awesome EL/MAC haul! You can look forward to future reviews on the products I bought (Probably while I'm sick in bed recovering from my wisdom teeth removal). Until then, let me know about your favourite EL and MAC products and your experiences at past cosmetic warehouse sales. Comment below!

xox,
Ysobel

Make-Up Repair Tutorial

Good morning all!

Here is the long awaited broken makeup tutorial! Here's a reminder of what happened last week....

So I dropped my entire makeup bag on the ground and my bronzer basically died. Fear not! Here is a simple tutorial on how to go about fixing your broken makeup while keeping the colours as separate as possible!


(A) Gather your materials. You'll need:
Your broken makeup, rubbing alcohol, a skewer, an eye shadow brush and a medicine dropper (not pictured here but seen in later shots). Also grab a piece of paper and a small flat object (Similar to a USB-wall adapter).
(B) Here's a photo of the broken compact once again.
(C) Fill your dropper with rubbing alcohol. Targetting the top right section (The broken one that's still the most intact), drop the alcohol on the cracks and gently push the pieces together using your skewer. Continue to shape the section until it returns to its original shape (or as close as you can).
(D) With your first section entirely intact, continue to crush the next segment into smaller, more manageable segments with your skewer, until it reaches a consistency close to the one above.
(E) Using your medicine dropper, add a few drops of alcohol and mix with the pigment until it forms a paste. Try not to add too much alcohol, you don't want it to be too liquidy because it'll be difficult to work with.
(F) Using an eye shadow brush, gently sweep any loose pigment into your big pile of pigment goop. Proceed to spread the goop with your skewer. Try to get right to the edge of the pan.
You can also place a few drops of alcohol wherever the makeup has separated from the pan. Use your skewer to push these pieces back into place. Allow to dry for 1 HR.
(G) Using a piece of paper and a small, flat object, flatten the makeup to create an even surface. Place a piece of paper on top and gently maneuver it under an object with a flat side. I picked the adapter because it was small enough to fit my pan and had the curved corners to match the edges of the pan. For some reason I picked a receipt I had on the table from a coffee I bought earlier that day... Don't worry! None of the ink transfered!
(H) Allow your pressed makeup to dry for a full 24-48 hours until you use it again.

VOILA! Your makeup has been restored. When doing this, keep a few things in mind:

(i) Don't douse your makeup in alcohol. If you put too much alcohol on it, your makeup will have cracks in it as the alcohol evaporates. If you accidentally added too much alcohol, gently press your makeup further into the pan using the paper/adapter method every 4 hours or so.
(ii) If you didn't use alcohol on the entire thing (like me), the "water mark" (from the alcohol between a wet and dry segment) may not completely disappear when the makeup dries. Not to worry, it won't affect the pigmentation of your makeup.
(iii) If you're really in a pinch and you don't have rubbing alcohol, try a toner! My friend actually did this with one of her bronzers that broke because she didn't have rubbing alcohol on hand and it worked!

I'm so happy because my favourite bronzer's back in my makeup bag and I don't have to keep using another gross ashy coloured one anymore haha.

Have you tried this method before? I'd love to hear your makeup rescue stories!

xox,
ysobel


Friday, May 31, 2013

Fixing Broken Makeup - Tutorial Teaser!

Good afternoon y'all!

I woke up several hours earlier than usual this morning because I had a dental consultation at 7:30 (ugh). I don't even wake up at 7:30AM normally. I found out that I have to get all four of my wisdom teeth removed (BOO) because they're overcrowding my mouth like crazy. On my way home, I dropped my makeup bag on the concrete in front of my house.

Have you ever dropped your makeup bag/some other palette on a hard surface before? Every time it happens to me, or every time I see it happen, I gasp and my heart literally skips a beat. Nothing sucks mroe than opening up your makeup bag only to find your precious pressed makeup crumbled, smothered all over everything else in your bag that (hopefully) didn't break.

To my surprise, the majority of my makeup survived the fall. The only exception was my E.L.F. Studio Bronzer in Warm (As featured in my very first post, here).

The only casualty from this morning's dreadful makeup bag drop.
I'm lucky it didn't spread everywhere and that the rest of my make up remained in tact. This is however my current go-to bronzer. Despite the fact that it's only $3 and I could replace it in a jiffy (well a little longer than that because I still have to order it off of ELF's website and wait for it to ship to Canada), I wanted to save it. I hate seeing makeup go to waste because it's broken. Pressed makeup- eye shadows, pressed powders, blushes, etc. are actually relatively easy to fix; so easy that you likely have the products sitting in your own house right now.

My bronzer is currently in repair. One it has returned to it's usable state I'll finish this post and show you how to fix your broken makeup without having to destroy and crumble the entire thing (Which would be detrimental in this case because this bronzer is segmented into four lovely separate colours). I actually managed to save the two that were broken and press everything else back into position. It's a little lumpy looking... hopefully I'll be able to rectify that before I post it up here.

Stay tuned! I'll be posting a great tutorial for all of you in the next 48 hours, complete with step by step instructions on how to repair your shattered but prized pieces in your makeup collection.

xox,
Ysobel

Tuesday, May 28, 2013

What's your Skin Type?: Digging up the dirt on skin types to help you find the best products for your skin

Hi everyone!

So the other night my friend came over to my place, complaining that his (I quote) "face was falling off". He had some flaking, things were itchy, and being a guy, he was picking at some weird scab on his nose. I ran upstairs to grab my emergency face-saver kit (which I will share in a future post) and gave him a mini-facial in the comfort of my living room. In the same way I was trained while working on a cosmetics counter at a department store, I asked him what his skin type was, how he felt after washing his face, etc. to make sure I was applying the right products for him.

Then it dawned on me. I guess a lot of people don't know what their skin type is. People are probably buying the wrong skin care products for their skin type... which is probably why so many people are complaining about their skin. It is imperative that you use proper skin care products to (1) make sure you're using the right combination of things to keep your skin looking its best (2) to prepare a canvas for any makeup application.

So, Mr. Suburban Bachelor, this post is dedicated to you. Here is my guide to figuring out your skin type, which will help you find the best products for your skin later on.

Generally, there are about 3 major classifications that most skincare companies use to organize their products: OILY, DRY, COMBINATION. You may also have heard of terminology like dehydrated and sensitive that I will address later on.

When figuring out your skin type, here are some questions you need to ask yourself:
How does my skin feel after I've washed my face (with your normal cleanser)? Does it feel dry and tight? Is it shiny?
Where is it dry/shiny?
Halfway through the day, do you have any shine on your face?
Do you need to blot? Blotting tissues help remove excess oil.

OILY SKIN: Generally after washing your face, you don't want to put anything else on it. You don't want to put any toners or moisturizers or anything on your skin because there is a film of sebum (facial oil) on your skin's surface. Nothing feels tight, and you are super shiny all over your face and feel that you need to use blotting papers several times daily.
There is a benefit to being oily-skinned: Despite looking like a greaseball, you will age gracefully. As we get older our skin tends to move more towards the drier side of things. Excess oil as a youngster means balanced skin when you're older. Your excess sebum will help (future) fine lines and wrinkles that contribute to aging.
Products: Use things targeting Oily Skin. These are light-weight, oil-free moisturizers, toners and cleansers that will help manage the excess oil on your face instead of add more. Even though you may feel like you don't want to add moisture to your face, but it is crucial that you use a moisturizer because it is possible for oily skin to be dehydrated.

DRY SKIN: After washing, your forehead and cheeks feel tight and drier than the Sahara Desert. Even after moisturizing your face feels tight, sometimes you'll experience occasional flaking from your dry skin cracking. Your skin is matte and you have little to no shine on your T-Zone (Forehead and Nose area).
Unfortunately, dry skin get even drier as you age, making you more prone to fine lines and wrinkles. This is why it's so important to get yourself on a proper, regular skin care regime that moisturizes your skin properly to help fight aging later on.
Products: Use products targeting dry skin (duh). These balance the oil-based and water-based moisture on your face to help keep everything soft and supple. Stay away from toners with alcohol in them because they will strip your face of its water content. Exfoliate regularly to keep your flaking at bay and make sure to use a moisturizer at night to allow your skin's night-time repair process to work as efficiently as possible.

COMBINATION SKIN:  Your forehead and nose feel comfortable after washing but your cheeks tend to flake. You have excess sebum glands on your forehead and nose but not so many on your cheeks, which is why your forehead and nose are oily but your cheeks are dry. You need to blot your T-zone 1-2 times daily to keep shine under control, but the rest of your face is matte. Sometimes you experience flaking on your cheeks and in the side crevices of your nose but seldom on your forehead and nose surface.
Products: Products targeted to Combo skin help rebalance the oil on your face - making the oil parts less oily and the dry parts more moisturized. You can use toners with a little bit of alcohol in them, but make sure they are of a gel-like consistency to help moisturize while it balances the excess oil.

Sensitive skin reacts through swelling, redness, or inflammation to products that your body will naturally reject. There are few products you can use on your face, even plant-based ones, because you will probably flare up. Stay away from products that contain fragrance because those are usually what irritates the skin.
Dehydrated skin lacks water, not oil. That is why it is possible for oily skin types to be dehydrated. Water hydration in your skin is within the epidermal layers, not on the surface. Look for products that have Sodium Hyaluronate or Hyaluronic Acid in them, these will add water-based moisture to the inner layers of your skin.
How do I know if my skin is dehydrated? When looking in a mirror, place your finger against the side of your cheek and gently push upwards without pushing into the skin. If you see fine horizontal lines on the skin on top of where you are pressing, your skin is dehydrated.

My tips for all skin types:
Exfoliate regularly.
 You need to use either a facial scrub or peel one a week to slough off dead skin cells. This ensures that your moisturizers and other products are penetrating the skin instead of sitting on the skin's surface.
Use a toner. Toner helps to balance the moisture of the skin's surface and primes it for moisturizer. After using a toner you'll find your moisturizer goes on much smoother. Stay away from anything with too much alcohol in it (IE: Alcohol is first or second ingredient) because it WILL strip your skin of its water content.
Use Sunscreen. Since the majority of our aging is due to the environment, SPF is the greatest anti-aging agent you could ever have. Invest in a moisturizer that is at least SPF 15, or find a facial sunscreen you can wear over your current moisturizer to boost its SPF.

Like skin tones, skin types are an entire spectrum. You can be Dry-Combo and Oil-Combo. You can have dry, sensitive skin, or you can be oily but dehydrated. Some companies have skin care products for the in-betweeners (Dry/Combo and Oily/Combo) and for people with sensitive skin. The key is to figure out what you are - that way you can purchase the products that are made for your skin that will help your skin look its absolute best.

Thank you, Suburban Bachelor, for inspiring me to write this. (There is a link to his blog, in case any of you ladies want the inside scoop on this guy, haha).

Let me know your experiences with any skin care products you've tried in the past. I'd love to hear from you!

xox,
Ysobel

Friday, April 26, 2013

Mascara Woes

So like I promised, I'm going to talk about the big deal with mascara.

Take a look at the bottom of your tube of mascara. Actually, this goes for all kinds of cosmetics (face creams, eye shadow, foundations, etc.) There should be a picture of an open jar that has either 3M, 6M, 12M, 18M on it. That is how long your cosmetics can be used after you open it, essentially an expiry date (yes, cosmetics indeed DO expire!).

image care of bunbunmakeuptips.com

For mascara and most eyeliners/eye primers, the is anywhere between 3-6 months. For eyeliner pencils that need to be sharpened, that's around 36M. As a former microbiologist, I STRONGLY recommend that you follow the manufacturer's suggestion. Have you ever heard of the "mini world inside your eyelashes"? That because it actually exists. Your eyelashes help protect your eyes from daily assaults, not only from things like blazing sunshine, but from all of the crap in the air that you and I breathe in. Our nostrils have nose hairs, our respiratory tract has cilia, and our eyes have eyelashes. Anything that our eyelashes don't catch is caught in our tears and eventually "cried out".

I'll be the first to admit it - for a while I kept mascara for as long as there was still product in the tube. After studying some microbiology in school and working for a while in the cosmetics industry, I realized how nasty that was. Every time your mascara wand applies product to your lashes, it combs your lashes of all the crap they caught protecting your eyes. So for as long as you're using that same mascara tube, you're dragging more and more crap through your eyelashes. Bacteria is multiplying at exponential rates - the bacteria already in your tube from past uses, and the bacteria you're going to collect on it the next time your use it on your lashes, will be multiplying at astronomical rates.

This is precisely why I think that mascara tip (adding contact lens solution to your dried up mascara tubes) on Pinterest is absolutely revolting. Yuck.

The 3-6 month expiry also considers the mascara's consistency. Every time you open up your mascara, you're pumping more air into it, drying it out. Your mascara will keep the same, usable consistency for about 3-6 month's time. After that, the formula has been exposed to waaay too much air and is no longer suitable to use.

So what do to? First, throw away all of the mascara you purchased and opened before the end of last year. A makeup artist friend of mine writes the dates she opens up her mascara on the actual tube to help her remember. As per my last post, I like to use the small tubes you get in GWPs or as samples because there's only enough product in there to last you a few months evenwith every day use, so you don't have to worry about exceeding your mascara's expiry date. Lastly, if you can, use one mascara at a time, so you really get your money's worth of product (especially for department store mascaras, those are $18CAD - $31 a pop!).

I'll talk more about the expiry of cosmetics products in a later post. In the meantime, anyone else kept a mascara longer tan the manufacturer's suggestion? What's the longest you've kept your mascara? No worries, I won't judge... like I said, I used to keep mine forever, haha.

xox,
ysobel